August 18, 2022

How to call solidity functions with Web3, metamask library

Public view/pure functions can be simply called. However, in other cases, you need to log in because of gas fee. It can be done with metamask.


public view/pure 함수는 간단히 호출할 수 있다. 그러나 그 외의 경우는 가스비를 제출해야하므로 로그인이 필요하다. 이를 위해 여기서는 메타마스크를 활용하는 방법을 알아본다.


1. public view/pure function

<script src="https://cdn.jsdelivr.net/npm/web3@1.7.3/dist/web3.min.js"></script>

<script>
const rpcPolygon = "https://polygon-rpc.com";
let web3 = "";
let contract1 = "";
async function main(){
    web3 = await new Web3(rpcPolygon);
    contract1 = await new web3.eth.Contract( [ABI], [Contract Address] );
} main();

async function callTmp(){
    contract1.methods.[function name]().call({from: [wallet address]})
    .then(function(result){
        console.log(result);
    })
    .catch(async function(e){
        console.log(e);
    });
}
</script>


Write the JavaScript code as above. It is used by calling the callTmp() function when necessary.


위와 같이 자바스크립트 코드를 작성한다. 필요할 때 callTmp() 함수를 호출하여 사용한다.


2. public function

<script src="https://cdn.jsdelivr.net/npm/web3@1.7.3/dist/web3.min.js"></script>

<script>
let web3 = "";
let contract1 = "";
async function main(){
    web3 = await new Web3(window.ethereum);
    contract1 = await new web3.eth.Contract( [ABI], [Contract Address] );
} main();

async function callTmp(){
    let param = {
        from: [my address],
        to: [contract1 address],
        value: [send coins if you want],
        data: contract1.methods.[function name]().encodeABI()
    };

    ethereum.request(
    {
        method: 'eth_sendTransaction',
        params: [param]
    })
    .then(async function(txHash){
        let receipt = null;
        while(receipt == null){
            receipt = await web3.eth.getTransactionReceipt(txHash);
            await sleep(3000);
        }
        console.log("Txhash:", receipt.transactionHash);
    })
    .catch(async function(error){
        console.log(error);
    });
}

async function sleep(milliseconds) {
    return new Promise(resolve => setTimeout(resolve, milliseconds))
}
</script>


Metamask uses the ethereum.request() function to generate a transaction. As before, proper use of the callTmp() function can help.


메타마스크에서는 트랜잭션 발생을 위해 ethereum.request() 함수를 사용한다. 이전과 마찬가지로 callTmp() 함수를 적절히 사용하면 도움이 될 수 있다.


August 17, 2022

How to initialize Web3 library in Javascript

To use Web3, there are two ways to enter an RPC address or use a metamask.
Web3를 사용하려면 RPC 주소를 입력하거나 메타마스크를 이용하는 방법이 있다.


1. Using RPC Address (Polygon Network).
1. RPC 주소를 입력하는 방법(폴리곤 네트워크).

<script src="https://cdn.jsdelivr.net/npm/web3@1.7.3/dist/web3.min.js"></script>

<script>
const rpcPolygon = "https://polygon-rpc.com";
let web3 = "";
let contract1 = "";
async function main(){
    web3 = await new Web3(rpcPolygon);
    contract1 = await new web3.eth.Contract( [ABI], [Contract Address] );
} main();
</script>


2. Using metamask.
2. 메타마스크를 이용하는 방법.

<script src="https://cdn.jsdelivr.net/npm/web3@1.7.3/dist/web3.min.js"></script>

<script>
let web3 = "";
let contract1 = "";
async function main(){
    web3 = await new Web3(window.ethereum);
    contract1 = await new web3.eth.Contract( [ABI], [Contract Address] );
} main();
</script>


February 01, 2022

How to print coordinates on the screen with Python


import matplotlib.pyplot as plt

x = [100, 500, 100, 500 ]
y = [100, 500, 500, 100 ]

plt.fill(x, y, color="lightgray")
plt.show()


Using Python's matplotlib module, displaing coordinates is simple. However, the system must support GUI.

파이썬의 matplotlib 모듈을 이용하면 간단히 좌표를 표시할 수 있다. 다만, 시스템이 GUI를 지원해야 한다.


Make two lists to store X, Y coordinates. And enter it in the fill() function. Then, the coordinates are automatically represented by the pair. If you specify a color in the color option, you can paint the interior of the coordinate.

x, y 좌표는 각각의 리스트로 생성한다. 이를 fill() 함수에 입력하면 자동으로 쌍을 지어 좌표가 표현된다. color 옵션에 색을 지정하면 좌표 내부 공간을 칠할 수도 있다.


How to convert TTF to TTX(XML) with Python


Converting font files using Python is simple. Just call the saveXML() function of the fontTools module. 


파이썬을 이용한 폰트 파일 변환은 간단하다. fontTools 모듈의 saveXML() 함수를 호출하면 된다.


from fontTools.ttLib import TTFont

font = TTFont("xxx.ttf")
font.saveXML("xxx.ttx")

1. Input TTF and create an object with TTFont().
2. Call the saveXML() method of the object to save it.
3. Check the generated TTX file in the same directory as the Python file.

1. TTF를 입력하여 TTFont()로 객체를 생성한다.
2. 해당 객체의 saveXML() 메소드를 호출하여 저장한다.
3. 파이썬 파일과 같은 디렉터리에 생성된 TTX 파일을 확인한다.

December 13, 2021

How to update WSL1 to WSL2


WSL1 cannot run 32-bit ELF files, so the update to WSL2 is required. The process is as follows.


WSL1은 32비트 ELF 파일을 실행할 수 없으므로 WSL2로 업데이트가 필요하다. 해당 과정은 아래와 같다.


1. Check the version.
버전 확인.

> wsl -l -v
  NAME            STATE           VERSION
* Ubuntu-20.04    Stopped         1


If the WSL version is 1 when you enter the above command in CMD or Powershell, you need to update it.


CMD 또는 파워쉘에서 위와 같이 명령어를 입력했을 때 WSL 버전이 1로 나온다면 업데이트할 필요가 있다.


2. Enable VirtualMachinePlatform option.
VirtualMachinePlatform 옵션 활성화.

> dism.exe /online /enable-feature /featurename:VirtualMachinePlatform /all /norestart


Reboot after entering the above command. 


위 명령어를 입력 후에는 재부팅한다.


3. Install Linux Kernel Components.
리눅스 커널 구성요소 설치.

Windows Subsystem for Linux Update Setup (Link)


Reboot after installation is complete. 


설치 완료 후 재부팅한다.


4. Apply WSL2.
WSL2 적용.

> wsl --set-version Ubuntu-20.04 2

변환이 진행 중입니다. 몇 분 정도 걸릴 수 있습니다...
WSL 2와의 주요 차이점에 대한 자세한 내용은 https://aka.ms/wsl2를 참조하세요
변환이 완료되었습니다.

> wsl -l -v
  NAME            STATE          VERSION
* Ubuntu-20.04    Stopped        2


For the application target, input what is written in "NAME". If the WSL2 application is successful, you can see the string "Conversion is complete" and the number in "VERSION" is changed.


적용 대상은 "NAME"에 적혀있는 것을 입력한다. WSL2 적용 성공 시 "변환이 완료되었습니다."라는 문자열을 확인할 수 있으며 "VERSION"의 숫자가 변경된다.


August 20, 2020

How to free TCP port 9001


TCP 9001 port


If the System process occupies port 9001 as shown in the picture above, the following solution can be helpful.


만약 위 그림과 같이 9001번 포트를 System 프로세스가 점유하고 있다면, 아래와 같은 해결 방법이 도움이 될 수 있다.


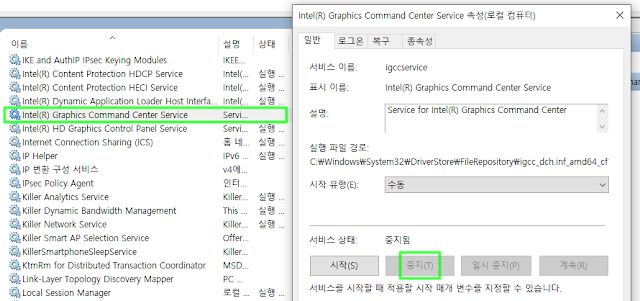
Intel(R) Graphics Command Center Service at services


Stop "Intel(R) Graphics Command Center Service" from "run → compmgmt.msc → services". Then the occupied port 9001 is released.


"실행 → compmgmt.msc → 서비스"에서 "Intel(R) Graphics Command Center Service"를 중지한다. 그러면 점유 중이던 9001번 포트가 해제된다.


August 12, 2020

How to use scapy Python module

❑ How to read packets from pcap.
pcap 파일로부터 패킷 읽기.
from scapy.all import *

pks = rdpcap("./filename.pcap")

for pk in pks:
    if pk.getlayer("IP").sport == 4321:
        layerRaw = pk.getlayer("Raw")

❍ getlayer(): Select a specific network layer.
특정 네트워크 계층을 선택한다.

❍ sport: Source port. 소스 포트.


❑ continue...